Network
LAN network monitoring is not implemented yet in XorMon NG, we expect its support later in 2024.
So far you might use STOR2RRD for its monitoring.
Do you want to let us know your priorities? Vote for your missing features and device support. More votes, bigger priority for us.
So far you might use STOR2RRD for its monitoring.
Do you want to let us know your priorities? Vote for your missing features and device support. More votes, bigger priority for us.
 |
SAN switch access summary
| Vendor | Storage type | User role | Interface | Used ports |
|---|---|---|---|---|
| Brocade | SAN switch | read-only | SNMP v1,2,3 | 161 UDP |
| QLogic | SAN switch | read-only | SNMP v1,2,3 | 161 UDP |
| Cisco | MDS and Nexus | read-only | SNMP v1,2 | 161 UDP |
Installation procedure is same for Cisco, Brocade and QLogic switches.
Only in case of usage Brocade/QLogic Virtual Fabric you have to do special access configuration.
Cisco VSAN support works automatically.
Brocade note: SNMP v2 is not supported in FOS v9.0.1a but is not blocked. SNMP v2 is blocked beginning with FOS v9.1.0.
Configure access to switches
- Allow SNMP communication from XorMon NG host to all SAN switches on port 161, UDP
- Brocade SNMPv3 setup
Test SNMP communication from cmd line
Follow that in case connection test does not work only.-
replace switch_IP for your one in below examples
- Make sure there is SNMP allowed on the SAN switch with public read only role (Community 4)
-
Brocade/QLogic:
Change community string to whatever you need via "snmpConfig --set snmpv1"
# ssh <Switch_IP> -l admin SAN:admin> snmpconfig --show snmpv1 ... Community 4: public (ro) ...
-
Cisco:
When there is other community string than public then use it in test snmpwalk cmds above
# ssh <Switch_IP> -l admin switch# show snmp community Community Access --------- ------ private rw public ro
and use that community string in switch cfg.
-
Brocade/QLogic:
- Make sure that Access Host list contains XorMon NG host:
SAN:admin> snmpconfig --show accessControl

-
Make sure you have enabled all listed MIBs below:
SAN:admin> snmpconfig --show mibCapability FE-MIB: YES SW-MIB: YES FA-MIB: YES FICON-MIB: YES HA-MIB: YES FCIP-MIB: YES ISCSI-MIB: YES IF-MIB: YES BD-MIB: YES BROCADE-MAPS-MIB: YES
Enable all missing MIBs each by each::SAN:admin> snmpconfig --enable mibCapability -mib_name FICON-MIB
-
set SNMP GET security level to 0
SAN:admin> snmpconfig --show seclevel SAN:admin> snmpconfig --set seclevel Select SNMP GET Security Level (0 = No security, 1 = Authentication only, 2 = Authentication and Privacy, 3 = No Access): (0..3) [3] 0
- Do you have some other switch which works fine, is there any configuration difference?
# export PATH=$PATH:/opt/freeware/bin
# snmpwalk -v 2c -c public  <Switch_IP> 1.3.6.1.2.1.1.5
  SNMPv2-MIB::sysName.0 = STRING: SAN_switch_name
When the command fails, times out or return whatever like this:
Timeout: No Response from <Switch_IP>
Brocade/QLogic Virtual Fabric support
- you have to use SNMP v3 with proper security user
- Configure security user on the switch (under admin account):
Parameter -l 1,128 defines virtual fabrics visible for this user.
userconfig --add snmpuser1 -r user -l 1,128
userconfig --change snmpuser1 -r user -l 1,128 -h 128 -e no
Parameter -h 128 defines home virtual fabrics.
Parameter -e no disables user expiration
Example above allows virtual fabrics 1 and 128 for user snmpuser1.
- Test access, you should see ports configured for your specific VF (Virtual Fabric).
If you get one of below errors then user is not configured properly:
$ snmpwalk -v 3 -u snmpuser1 -n VF:<your_virtual_fabric_ID> <Switch_IP> 1.3.6.1.2.1.1.5
  SNMPv2-MIB::sysName.0 = STRING: SAN_switch_name
Error in packet.
Reason: noAccess
snmpwalk: Unknown user name
Switch configuration
- Add switches into configuration from the UI:
XorMon NG UI ➡ Device ➡ Network ➡ SAN switches ➡ New ➡ Vendor:device ...

- Run "Test" for configured switch, it must show "OK"
-
Wait about 1 hour, then refresh the web browser cache by Ctrl-F5
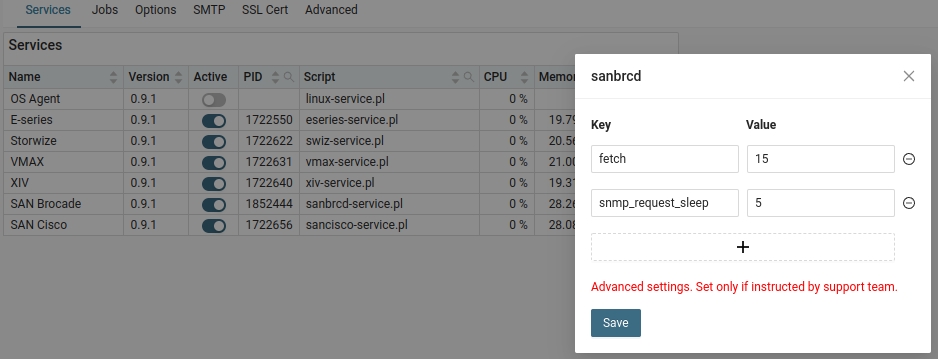
- If you use SNMP v3 and have several virtual fabrics then monitoring might cause unwanted CPU peaks every 5 minutes on monitored switches
To decrease such CPU peaks into acceptable level configure SAN microservices like that- Increase data fetch from default 5 minutes into 10 or 15 minutes
- Increase default timeout between SNMP queries from default 1 sec to 5 secs
-
SAN troubleshooting